Relation Reference widget
The original version of this document is located at https://docs.qfield.org/how-to/project-setup/relation-reference-widget
Relation Reference Widget
Sometimes it can be useful to relate different layers with each other when they are depending on each other or when you want to add more than one record to a feature.
Example
In a building there are several apartments with different owners.
We can create a relation between the building and the apartments and between the apartments and the owners.
In such a case we make use of the relation reference widget to be able to add new children or to select a child from the existing ones.
Relation configuration
Before adding, editing or viewing the related features you have to set up a relation between the two layers.
Here it is important that you add an id (primary key) field to the parent layer (Reference Layer) that can be used as a foreign key in the child layer (Referencing layer).
These fields are used for creating the link between the two layers.
Therefore, they must be unique.
Note: It is good practice to use uuid's as “unique ids” given they are 36 characters long and also contain non-numerical characters making them much safer to use over ordinary numerical ids.
Workflow
Creating the relation
- Direct to Project > Properties > Relations
- Press the green plus to add a new relation
- Set your Reference and your Referenced Layer in addition to the corresponding fields that will be used for the linking.
For more details please refer to the official QGIS documentation
Attribute Form Configuration - Reference Layer
- Direct to the Layer Properties > Attribute Form
- Find your
reference field, set the widget type to UIID generator and set a default value to *uuid(‘WithoutBraces’) - Find your relation under the “Relations Section” and add it to the form layout
- Set the Cardinality to “Many to one relation”
- Under the widget you can define whether children can be:
- linked
- unlinked
- edited
- added
- duplicated
- deleted
- zoomed into
- (Optional) If you want to filter your children further, you can use additional “expressions”.
- Once finished click “ok”
Attribute Form Configuration - Referencing Layer
- Direct to the Layer Properties > Attribute Form
- Configure your attribute form with the wanted fields.
- (Optional): Under Display you can set the appearance of how the children will be displayed
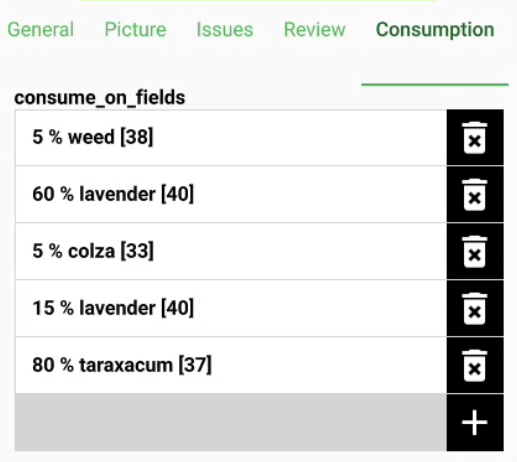
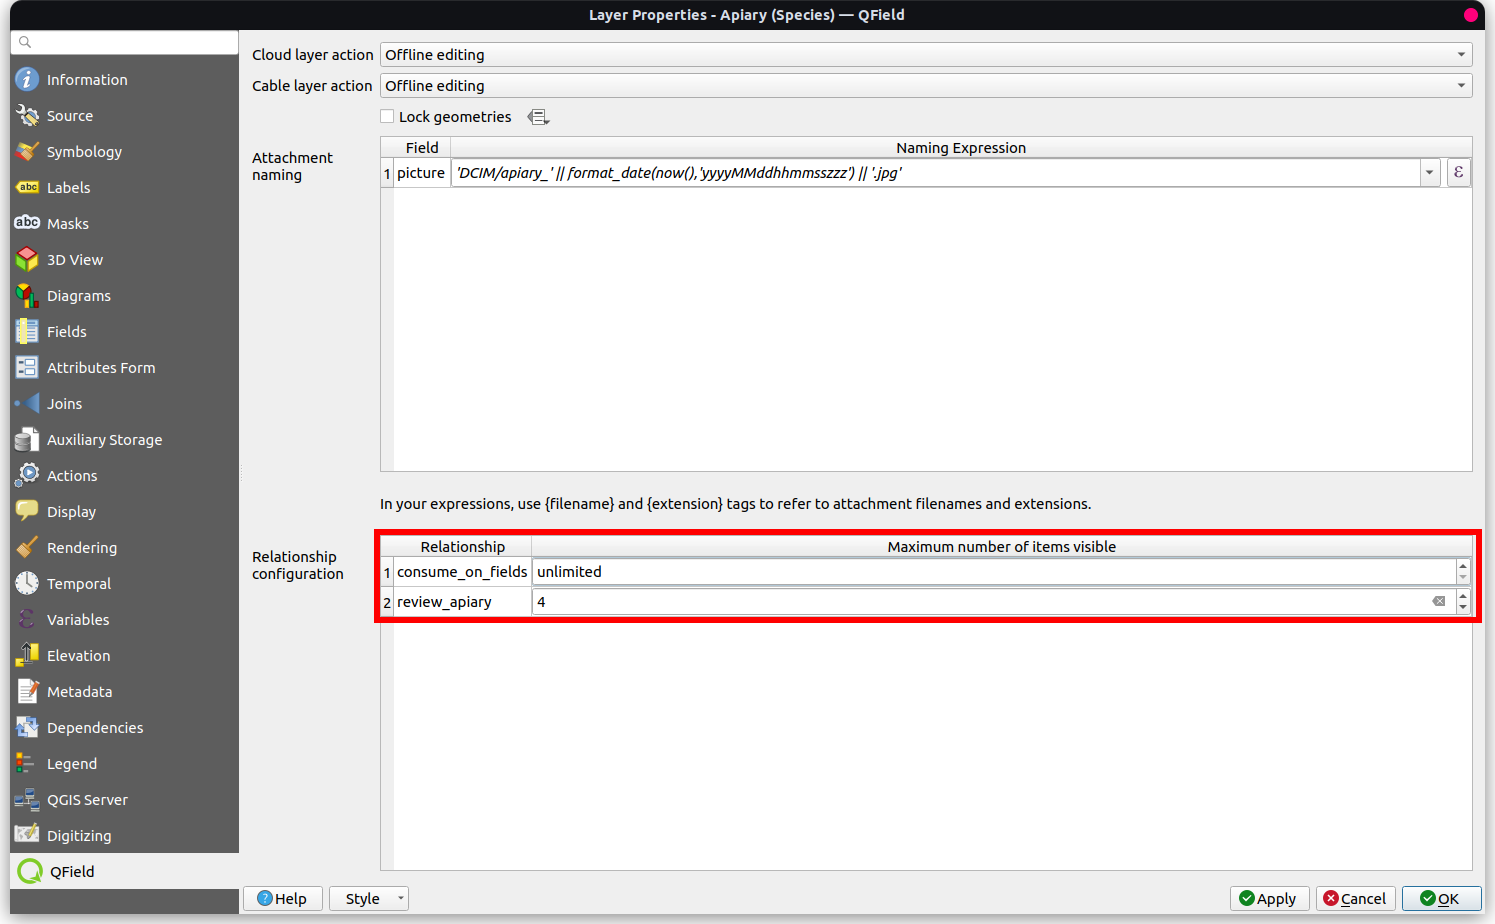
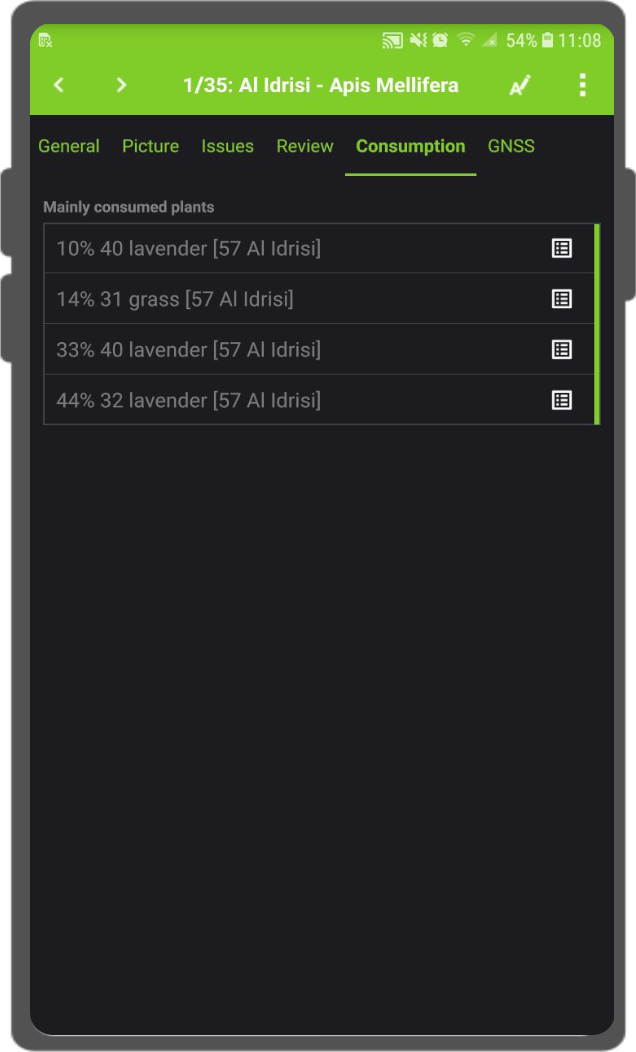
Maximum number of visible children
It is possible to limit the number of available children for your related layer if you are not interested in all items.
- Default Number of visible children: 4 children
- Unlimited: Empty
Workflow
- Direct to Vector Layer Properties… > QField.
- Under “Relationship Settings” set the “Maximum number of items visible”.
Many-To-Many relations
In the case of many-to-many relations you will need a linking table, which commonly is also termed as a “pivot table”.
In the official QGIS documentation you will find a detailed description on how to establish these more complex relations.
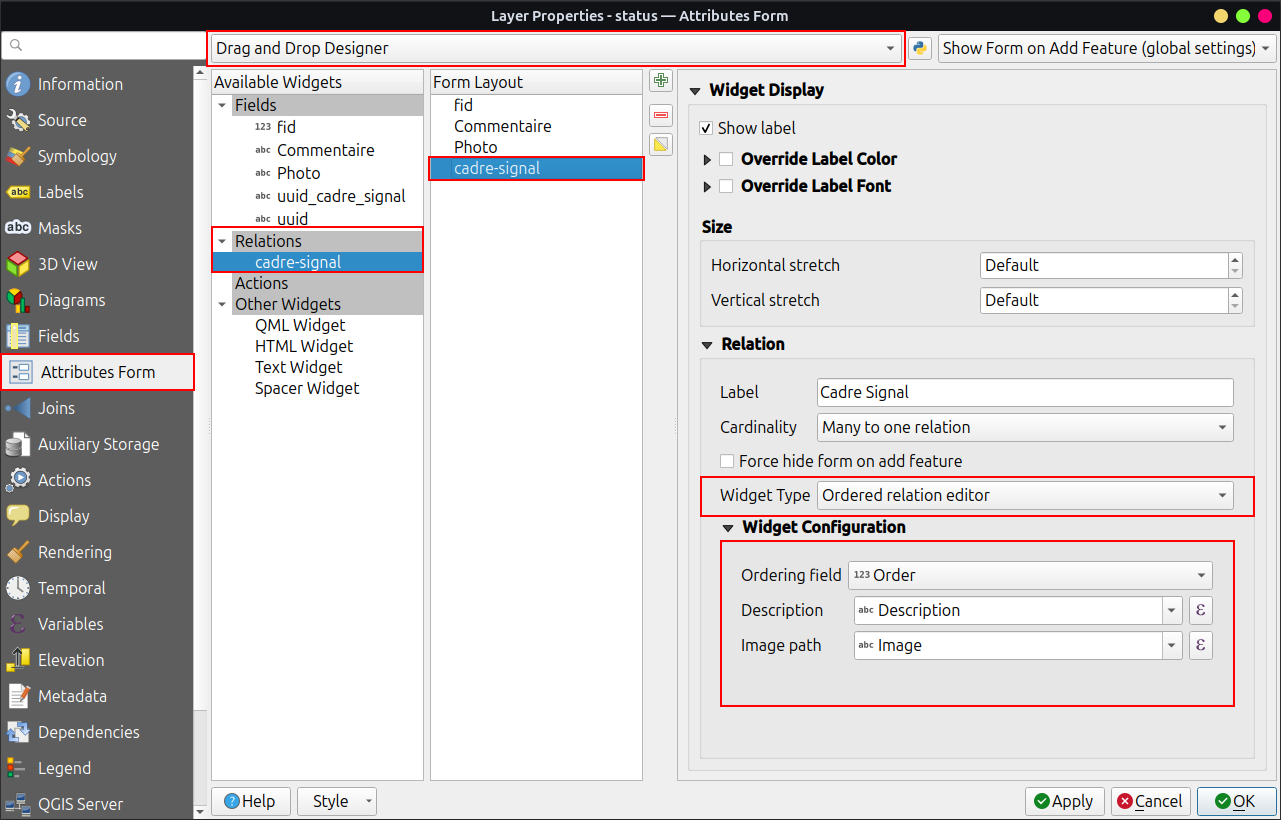
Ordered Relation
If required you can reorder linked child features based on a field by selecting the Ordered Relation Editor from the widget type options.
To enable this functionality, however, you require a second plugin Ordered Relation Editor
Workflow
-
Install the Plugin Ordered Relation Editor plugin from the official repository or through the “Plugin Manager” in QGIS.
-
Open the Vector Layer Properties… > Attributes Form and set the layout editor to Drag and Drop Designer.
-
Click on the relationship of your available widgets.
-
Direct to Properties > Attribute Form and find your relation under the relationship section.
-
On the right under “Widget Display” scroll down to the “Widget Type option and select Ordered Relation Editor.
-
Configure the widget using the following settings:
-
Ordering Field: Specify the field in the child layer that will be used to determine the order of the features.
-
Description: Define an expression to be displayed for each child feature in the list.
-
Image Path (Optional): Provide a path to an image or icon to visually enhance the list. This is an expression that resolves dynamically.
-

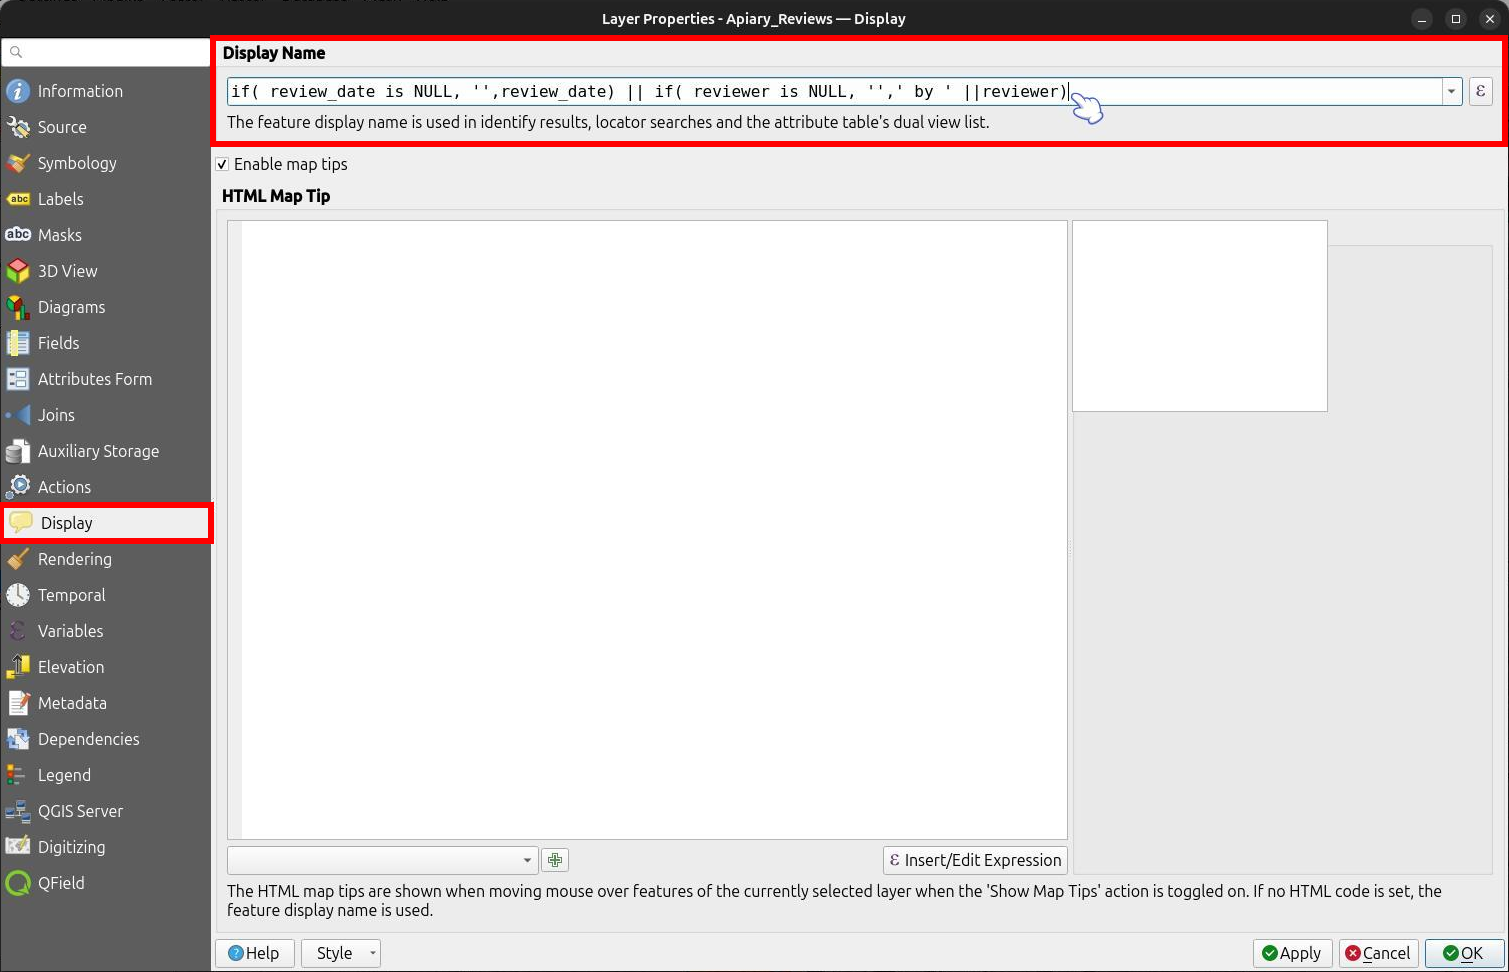
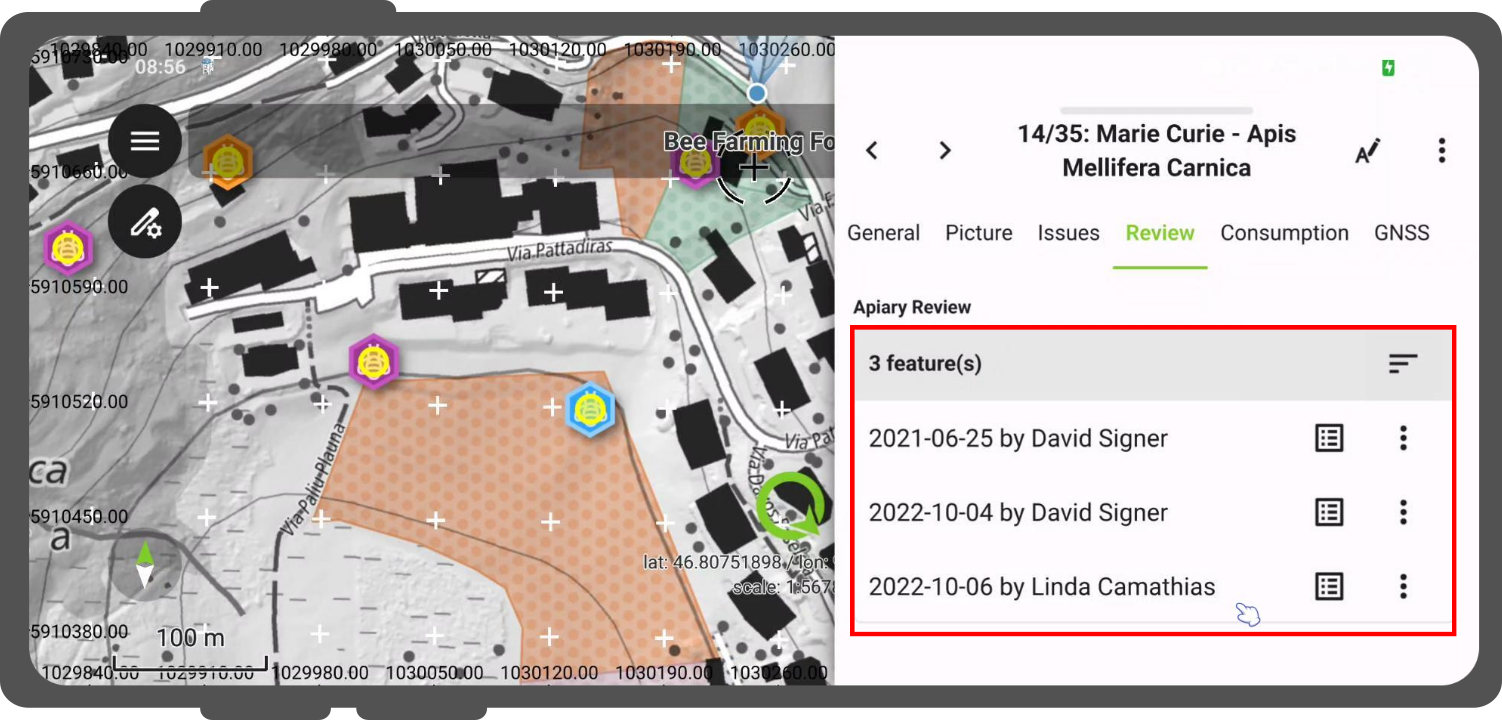
Custom name in Relation reference widget
Define the Display Name expression for the concerned layers,
this will be used to display the name in the relations.
You can configure your preferred display name under Vector Layer Properties… > Display
Gallery Relation Editor
QField automatically upgrades the standard relation editor widget to a Gallery Relation Editor for any parent-child relationship where the child layer is set to the Attachment widget.
This provides a highly visual, media-centric experience for browsing and managing related photos, videos, and audios directly from the parent feature’s form.
Key Features:
-
Grid and List Views: Toggle between a large-thumbnail grid view (perfect for browsing photos) and a compact list view using the switch at the bottom of the widget.
-
Dynamic Media Previews:
- Images: Displayed as thumbnails.
- Videos: Automatically play a muted, short preview.
Tapping the thumbnail allows you to play/pause the video. - Audio: Generates a real-time, dynamic audio waveform bar preview based on the actual audio file’s peaks.
-
On-Demand Downloads: If an attachment is not stored locally on your device,
QField will display a loading indicator and automatically attempt to fetch the file from QFieldCloud or your configured External Storage (e.g., WebDAV).
Ensure your device has an active internet connection if your project relies on remote external storage. -
Interacting with Media: Tap on any media card’s background to open the standard feature form for that specific child record, or tap the three-dot menu (⋮) to access specific actions like copying attributes.
Multi-Attachment Project creation Notes:
If you create a project from QField directly to digitize your notes (with “Take image and video attachments”), QField automatically creates an attachments field that links to a child layer.
These are related through a unique UUID.
When you then open a note in QField, you can add and browse multiple photos, videos, or audio recordings attached to a single note.
Workflow
Configuring the Gallery Editor in QGIS
🖥️ Desktop preparation
The Gallery Relation Editor does not require a specific “Gallery” widget type in QGIS.
Instead, it is automatically triggered based on your form setup.
- Open your project in QGIS and set up a standard 1:N relationship between a parent layer and a child layer.
- Open the child layer’s Properties > Attributes Form.
- Ensure at least one field in the child layer is configured as an Attachment widget type.
- Open the parent layer’s Properties > Attributes Form and add the relation to the form layout.
When opening the parent form in QField, the relation will automatically render as the interactive media gallery.

Related Articles
Attachment widget
The original version of this document is located at https://docs.qfield.org/how-to/project-setup/pictures Use attachment In QField, a field with Attachment widget can be used to: Show and take photos Show and record videos Listen and record sound ...Technical reference
The original version of this document is located at https://docs.qfield.org/reference/index Technical reference Here you’ll find the technical reference documentation about the different parts of the QField EcosystemSimple attribute form configuration
The original version of this document is located at https://docs.qfield.org/how-to/project-setup/attributes-form Attribute form Before you go into the field, you will have to configure your forms - the fields that the user will see in the fields. You ...Tips and tricks for QGIS projects, saving cloud storage
The original version of this document is located at https://docs.qfield.org/get-started/tutorials/tips-tricks-qfc Tips and Tricks for your QGIS project This page will give you an overview of all the tips and tricks you can apply to your project and ...Live default value
The original version of this document is located at https://docs.qfield.org/how-to/advanced-how-tos/live-default-value Live default value QField is supporting the “live” updating of default attribute value when editing features. This means, when ...