Plugins
The original version of this document is located at https://docs.qfield.org/how-to/advanced-how-tos/plugins
QField Plugins
QField has a QML/Javascript plugin framework through which additional functionalities and features can be scripted.
Types of plugins
Plugins can be served in two ways:
- as a project-specific plugin that will be active for the duration of a given project session;
- as an application plugin that will be activated when QField launches.
Note
A permission dialog is shown prior to activating a plugin, providing you with the possibility of granting or denying individual plugins.
Project plugins
Project plugins are deployed as a sidecar file to a given project file and must share the same file name with a .qml extension.
For example, if your project file is “tree_inventory_qfield.qgs”, the plugin’s main QML file must be “tree_inventory_qfield.qml”.
For cloud projects, you simply add the relevant QML file into your local cloud project folder and upload the newly added file on QGIS using qfieldsync.
This method insures a smooth plugin deployment and update to devices on the field.
For non-cloud projects, refer to the QField storage handling documentation page
to learn how to import projects onto devices.
Application plugins
Application plugins are installed through a plugins popup accessed from QField’s Settings panel.
Click on the “Install plugin from URL” button and paste in a URL pointing to a zipped plugin file, or download one of the “Available Plugins” already developed by the community.
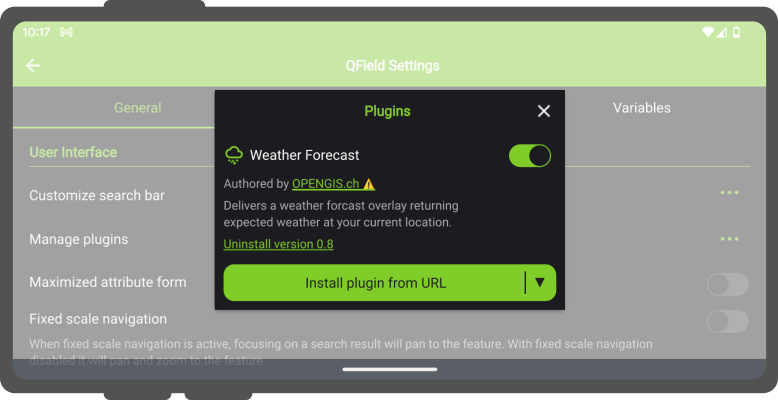
Once installed, the plugin will appear in the plugins list found in the popup, with a switch to toggle the activation of the plugin.
Developing a plugin
Find more information about QField plugin development on the dedicated QField API documentation.
Related Articles
Plugins
The original version of this document is located at https://docs.qfield.org/reference/plugins QField Plugins Technical Details This page is a collection of QField plugin framework APIs and behaviors to guide you into writing your own plugins. To see ...XLSForm Converter
The original version of this document is located at https://docs.qfield.org/how-to/advanced-how-tos/xlsforms-plugin XLSForm Converter Plugin for QGIS Use the XLSForm Converter plugin to convert existing XLSForms into QGIS projects. This tool migrates ...QR Codes
The original version of this document is located at https://docs.qfield.org/how-to/advanced-how-tos/qr-codes QR Codes in QField QField can leverage QR codes in multiple ways. This page lists a couple of ways in which you can easily share your ...QField general settings
The original version of this document is located at https://docs.qfield.org/how-to/general/settings QField General settings The general settings screen allows you to control the basic appearance and behaviour of QField. There are two ways in which ...Get started with QFieldSync offline
The original version of this document is located at https://docs.qfield.org/get-started/tutorials/get-started-qfs QFieldSync for Cable Packaging QFieldSync (QFS)) is the QGIS plugin, which you should use to “package” your projects for QField, which ...